I bought a domain name and transferred sites! So if you'd like to go follow me with feedburner there? That would be awesome!!!
The link is www.cookerynomnoms.net
I'm moving up in the world, yey :D

Monday, June 20, 2011
Thursday, June 2, 2011
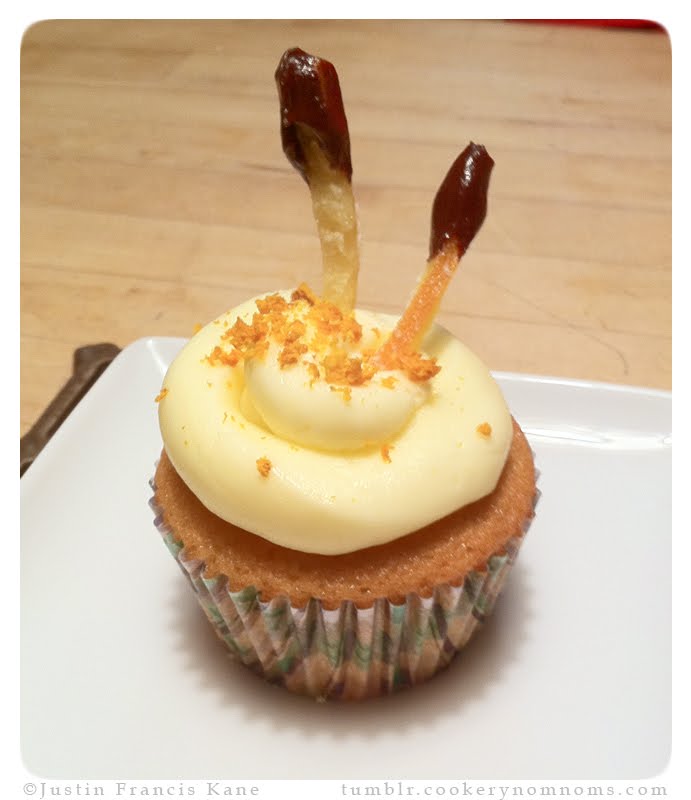
Naples Orange Cupcakes

I don't know what it is about the summer, but for some reason when this weather hits it boosts my spirits and makes me want to bake almost every single day! If only butter and crème cheese weren't so expensive... I have to say I probably would!
These Orange Zest Cupcakes are a perfect mixture of light and sweet flavors. Not over powering, and with a bittersweet surprise hidden in the center. You’ve had one of those chocolate oranges around Christmas where you slam it on the table and eat the individual slices? That’s what I was going for, but not so rich!
The garnishes are also candied orange peels rolled in sugar; so if you have the extra time, don’t forget to make these! It’s a lot of fun and totally worth it.

Ingredients for Orange Batter
• 1.5 cups of flour
• 1 cup of sugar
• 2 large eggs – room temperature
• 1 stick of butter – room temperature
• .5 cup of fresh squeeze orange juice
• .5 cup of heavy crème
• Zest of one whole Naples orange
• 1 tsp baking powder
• 2 tsp baking soda
Now I learned from my friend Kamran over at The Sophisticated Gourmet, a thing or two about mixing my cupcake batter. For some mystical reason my cupcakes kept turning out like corn bread or muffins rather than light and fluffy deliciousness! I was pissed and quite aggravated.
He gave me some helpful pointers, but it turns out the main reason was because I wasn’t creaming my butter and sugar long enough. Also, I was probably over mixing the batter at the same time too.
So now that I worked that out, what you want to do is take your butter at room temperature and with a hand or stand mixer crème your butter and sugar together anywhere between 5 and 10 minutes. I go for the full 10 because I don’t have a nice stand mixer yet.
After that, put your mixer away and use a spatula to fold the other ingredients into the whipped sugar and butter. I started with another bowl to combine my dry ingredients and whisk quickly to distribute the baking powder and soda evenly.
First I incorporated the eggs and orange juice, [please don’t use store bought… you must be kidding me!] stirring just enough to break the yolks and mix the juice. Then in three additions I folded in the dry ingredients, in between adding a little heavy crème as well. Fold the batter just enough so that it is even; you really don’t need the hand mixer at all. It only takes a minute with the spatula to do all this!
Fill your cupcake liners three quarters of the way and bake at 375F for 20 minutes on the top rack of your oven! Checking after the 15th minute just to be safe. Once you can pull a clean toothpick out of the center, they’re done! Let them cool while you make your frosting.
Ingredients for Orange Butter Crème Frosting
• 1.5 sticks of butter – room temperature
• 1 to 2 cups of confectioners sugar
• Half a squeeze of an orange
• Zest of same half of orange
Mix your butter and orange juice together, and then slowly add the confectioners sugar until desired consistency and sweetness is achieved! Add a little crème cheese if you like, again… At room temperature! I just had a friend at work that doesn’t like crème cheese so I left it out, normally I’d put 4 oz in this recipe otherwise!
If you don’t have a piping bag, fill a Ziploc bag and cut a small hole out of one of the corners, it’s basically the same thing! And I love how it looks, like it’s not trying too hard but it’s definitely got a little pizzazz, haha.
If your consistency is a little runny, either add more sugar or put it in the fridge to set up a bit! Now move on to the bittersweet chocolate ganache!

All you do is heat up a little heavy crème on the stove, and break apart some 85% dark chocolate and mix together… I used very little heavy crème because I wanted that bitterness to it. If you use too much heavy crème, you’ll just end up making milk chocolate so it’s up to you!

Once your heavy crème is boiling pour it over your dark chocolate and let stand for a minute or two. Then stir together. The more you mix the chocolate the thicker and denser the consistency will get; I wanted mine fairly runny so I barely mixed it at all.
Core out the centers of your cakes and spoon in the chocolate once the cupcakes have cooled. Then ice over the top to hide the chocolate!

Ingredients for Candied Orange Peels
• Two or three Naples oranges
• 1.5 cups of sugar
• 2 cups of Water
• Candy Thermometer
Start by peeling the oranges, to make this easier slice off the tops and cut into the peel in 4 segments, not cutting too deep into the fruit. After that, slice your peels into thin strips. Take a deep skillet and place your oranges inside, fill with water just so the oranges are covered.
Heat to boiling and blanch in cold water, do this at least three times! This removes all of the bitterness of the pith of the orange [the white bitter part of the skin].
Take your sugar and 2 cups of water and mix well. Heat on the stove on high for about 7 minutes. Using a candy thermometer make sure it is between 225 and 230 degrees F. This is called the ‘thread’ stage because if you drizzled a little sugar in cold water it would have a similar consistency.
Add your orange peels and once they are submerged do not stir them! If you stir them you could form unwanted crystallization. Reduce heat to low and cook for about 45 minutes to an hour. Test one and see if it’s sweet enough for you, if not… Keep cooking them!
Drain the simple syrup and save it! You can make ice tea or wonderful mixed drinks if you’d like, and the orange flavor will carry through into those beverages! Let the candied peels cool, and roll in extra sugar.
You’re supposed to let them dry for 5 hours or something like that, but I’m hella lazy so I baked them at 375F for about 25 minutes and it dried them right out! Haha.
Dip them in extra ganache you have left over and garnish the hell out of those cupcakes! I baked a little extra orange zest to sprinkle over top too. It’s just how I roll, haha.
Well guys, I have about 5 recipes on standby that I still need to write… But they are on their way! I’m hoping to get through a couple more today since it’s my day off, but I can’t make any promises! ;P
Hope you guys enjoy this one; it’s a ton of work… But totally worth it! Till next time foodies,
Justin Francis Kane
.
Tuesday, May 24, 2011
Salmon & Spinach Stuffed Ravioli

My poor poor blog! I’m so sorry, really. This past month or two has been ridiculously stressful with running out of money, and finding a new job, and then starting that new job! Phewf! I promise, now that I am all settled again and have the money to cook like I love to… You will not be undeserved!
Yesterday, I prepared a delicious hand crafted Salmon Ravioli with the help from one of my best friends! Sous-Chef Drew! [Which translates to Under-Chef… Which I like better ;]
Under-Chef Drew’s parents went to Paris for the week, so his girlfriend Erin and our mutual friends Gwenn and Kaitlin all got together to watch Jurassic Park and play Monopoly! The women sat in the living room, as the men slaved away in the kitchen…
Now this recipe is all by hand, and if Under-Chef Drew didn’t have a fancy hand crank pasta maker… This would have never came to be. So unless you can use a rolling pin better than [insert famous french pastry chef here], I would suggest not trying this at home ;}
Ingredients for Dough
• 4 eggs
• 3 cups of flour
• 2 tablespoons of extra virgin olive oil
• 2 to 3 minced garlic cloves
• .25 cup of chopped chives
• dash of salt
• dash of pepper
• squeeze of a full lemon
• zest of half a lemon
• 2 egg yolks to set aside, for binding the ravioli together
Combine all the ingredients with your hands in a large bowl, you’re gonna get sticky and gross… So have fun with that! I left my Under-Chef to do all the hard grunt work… But he wasn’t allowed to add the flavorful ingredients, just cracking eggs and leveling cups of flour. I suggest you put your significant other to work, or a friend who claims they can’t cook! Makes the lowly peons feel accomplished you know? Haha!
Set aside for half an hour, and cover it with a warm wet paper towel. Not drenched, but rung out almost completely.
Ingredients for Salmon Filling
• 1 pound of smoked salmon, or regular salmon if too expensive!
• 1 cup of heavy creme
• 2 garlic cloves
• quarter of a small onion
• squeeze and zest of a full lemon
• dash of basil
• dash of lemon pepper
• a large handful of shredded gruyere cheese
• a small handful of parmesan cheese
• 1 cup of ricotta cheese
• handful of chives
• dash of fleur du sal! [flower of the sea… SEA SALT… haha]
• handful of fresh spinach
Now one of the most important things about fleur du sal is that you must promounce it like a snooty french aristocrat while using it in your dishes! We had much fun doing this, or at least… I did.
If you can’t afford smoked salmon, which I couldn’t… Cause it’s packaged by like, 6 ounces and is 8 dollars a package or something? Crazy! I just got my local Price Chopper to get a nice pink meaty chunk from the pretty display freezer. The lady was super nice, and though she said she would skin it and rub it with lemon pepper before she wrapped it up… She forgot to skin it. And skinning salmon is not something I like doing, cause it feels gross and nasty and the sound makes your head shake.
You can tell fresh salmon by how pink it is, most of it is dyed before it gets to the store to make it appear fresher. But once you see that the pink has gone muddled and less vibrant, make sure you don’t get that one! The bad ones stand out like a dead rat next to a live rat when you see them next to each other. You can’t mistake it!
Puree the salmon meat and heavy creme first for about 2 minutes or until light and fluffy, then add all the ingredients except for the spinach and chives. Puree until smooth and blended, then add the spinach and pulse a couple of times. Make sure you don’t over puree, the greens should look a little chunky. You could even just break the spinach up by hand if you like.
Set that aside and it’s time to roll out your dough! Set up your machine and pre-flatten the dough as much as you can. Pre-Flour all your work surfaces first, the machine too! Put the machine to the largest pasta setting and feed it through in four equal separate batches. Drew’s pasta machine had 6 settings, so from high to low - big to small, I pulled through each batch at the largest -6- to a medium thickness -4- and then again to a -2-

For two of the batches I went to the thinnest setting, which was 1 or 0 I believe? and for two batches I went to a 2. The latter are a little thicker, so I used those as the base or bottom of the ravioli. The thinnest roll outs I used for the top.

Place a thicker roll out on a floured surface, and spoon in filling equally spaced apart. You don’t want to overstuff them, but you don’t want to understuff them either! Once you have a bunch of little mountains of salmon and cheese puree, your going to trace the outsides with a brush of yolk. Once every little hill has their specific outline, you take a thinner rollout of dough and drape it overtop. Press firmly from center to outer reaches, trying to get as much air out of the ravioli as possible.
Cut around the edges and trim them if you like, but I didn’t trim them… Didn’t see a need to. Each one is so different and unique, it’s precious. Some were big and some were small, some had a ton of extra foreskin and some didn’t, hahaha. It takes all sorts and shapes right? ;P
Let them sit for a good 5 or 10 minutes so they have time to bind to themselves. Boil some water with fleur du sal! And boil for about 6 minutes. Be very gentle when putting them in the water and taking them out! Use a mesh scooper if you have one, or a large ladle with slots in it. Place them in a colander and rinse with cool water, then use a little olive oil so they don’t stick together.

Line a tray with aluminum foil, turn your broiler on to low, and pour on some heavy creme, extra gruyere chunks, parmesan, extra chives, pepper, salt, and chunks of butter. Put the tray in the oven so everything melts, then put the ravioli on top of that and add more cheeses. Wait till they’re perfectly brown and voila! About 6 to 8 minutes, depending on the intensity of your broiler! WATCH THEM CAREFULLY. Once they start to brown they brown quick!

It took us forever, but that was partially because I was drinking my summer ale and making Under-Chef Drew do all the work… Haha. Hope you guys enjoy it, this makes a hefty meal… Each person had maybe 4 or 5? There were extra so we put some in the freezer before we even boiled them so they’ll stay nice and fresh.

Crispy, crunchy, smooth and creamy! I wish I had some friggin’ more… Damn…
Till next time food lovers,
I’ve got a bunch of recipes waiting for yah ;}
Justin Francis Kane
.
Monday, April 4, 2011
Mushroom, Bacon, & Spinach Crêpes with Chicken & Asparagus Risotto

I am so sorry for being absent the past week or two! I’ve been job hunting and also trying to get into shape, and with my cooking… You can’t really get fit with all the heavy crème, butter, and carbs I use ;}
It was recently my housemothers 57th birthday this past weekend! So my best friend Norah, who I live with, cooked her favorite meal. She only requested crêpes, but she also loves the risotto I make and I’ve been promising you guys that recipe for a while… So I thought why not kill two birds with one stone and give you two amazing recipes! Especially since I’ve been so inactive ;P We’ll start with the risotto, then lead into the crêpes.
Ingredients for risotto:
• 1.5 bushels of fresh asparagus
• 3 tenderized chicken breasts cut into cubes
• 4 to 5 garlic cloves, minced
• half a small onion
• half a stick of butter
• 2 cups of Arborio rice (very important that it’s Arborio!)
• dash of salt
• dash of pepper
• 2 lemon squeezes
• dash of balsamic vinegar
• 32 oz of organic chicken broth, or stock
• dash of heavy crème
• 1 to 2 cups of shredded Parmesan cheese (The good stuff! Not that imitation white powder crap, haha)
Now this recipe has the perfect balance of asparagus, chicken, and rice. It will also feed your whole family of 4 to 6 on it’s own! But this was a special occasion so we went a little overboard on the food front.
Cut your asparagus into 1-inch spears on the diagonal and set aside. Cube your chicken and cook with the garlic, onion, a squeeze of lemon, a dash of balsamic, salt, pepper, and a quarter stick of butter. Make sure the juices run clear, but also don’t overcook the chicken! It’s going to be thrown into the risotto the last ten minutes so any soft pinkness still in the chicken will surely cook out, don’t worry! Set that pan aside as well and make sure to not strain the juices, those are important!
Melt the rest of your butter in a very very big skillet or shallow pot. The one we use is easily 2 feet in diameter… So if you don’t have big enough kitchenware, maybe halve the recipe? Throw your two cups of rice into the simmering butter and cook for about 3 to 5 minutes, or until the grains start to turn translucent. You may need to add a little extra butter.
Throw in your asparagus and a cup or two of the chicken stock. You’re going to end up using all of it, but don’t add it all at once. As the rice absorbs it, slowly add more and pay attention. You have to constantly keep stirring this otherwise your rice will burn. It’s a little tedious but worth it I promise.
Once the asparagus is in with the rice, turn on your timer for 25 minutes. I’ve timed this out exactly, so you shouldn’t have any problems. Once the 25 minutes is up, you should be out of chicken stock; this is when you dump the rest of your precooked chicken and all its succulent juices into the mix! Stir, and then add a dash of heavy crème, 1 to 2 cups of grated Parmesan cheese and cook for an additional 10 minutes. Voila!

Ingredients for crêpes:
• 2 eggs + 1 egg yolk at room temperature
• .75 cup of milk
• .5 cup of water
• 1 cup of flour
• 3 tblsp melted butter
• dash of salt
• dash of pepper
• dash of oregano
• squeeze of lemon
Be very careful with this! We remade this better at least 3 times because of stupidity. Mix all your liquid ingredients together slowly, SLOWLY. You want to make as little air bubbles as possible. Do not whisk, I repeat… Do not whisk! This batter is very delicate and very liquid, so if you have a very low setting on your mixer use with caution. We stirred and folded by hand and strained the batter to get the lumps out which worked perfectly the third time around… Add the flour slowly, and afterwards cover it and let it stand for at least an hour for any bubbles you did form to release.
We had a trusty crepe maker that you just dip into the batter and it forms the perfect crepe, good luck to those of you with a skillet. All I can suggest is don’t use too much oil or butter to grease the pan and be careful!
Ingredients for filling:
• 1 box of frozen spinach, squeezed and patted dry
• half a small onion
• quarter stick of butter
• 2 large portabello mushroom heads, sliced thin
• 6 strips of cooked bacon, crumpled
• 1 cup of heavy crème
• dash of milk
• dash of chives
• dash of dill
• dash of salt
• dash of pepper
• squeeze of lemon
• 1 or 2 cloves of garlic, minced
• dash of Parmesan cheese, grated
• dash of flour
Start caramelizing your onions and then browning your mushrooms extra butter and remember not to overcrowd them! If there’s one thing that movie about Julia Child taught me, it was that! Throw in everything except for the milk and Parmesan and stir. Slowly add just a little bit of milk and then add the Parmesan. Cook for about 15 minutes more on low heat. If it’s not thickening up, add a little bit of flour slowly but surely and that should do the trick.
Spoon the filling into the crêpes, fold and set on a baking sheet covered in parchment paper. Sprinkle extra Parmesan or provolone on top and broil for about 3 to 5 minutes on low, watching very carefully so they don’t burn! As you can see from my photos, I was almost a second too late with those edges haha.
Phewf, what a long post! Sorry about all that rambling guys, but I hope you enjoy it! And I’ll try to be more active.
Later Food Lovers,
Justin Francis Kane
.
Sunday, March 27, 2011
A little lost...
I have an overwhelming feeling of being lost at the moment... I haven't been cooking, or baking. But mostly this is because I have something like seven dollars in my bank account. I'm unemployed, and my shoe-in of a job that I applied for last week says they'll call me for my second interview tomorrow... But I'm scared.
It's a very busy place, and I feel as if I should call to keep in touch with them because my message could be lost in the shuffle. But I've already called once, and they said they would call me back. So do I wait in misery all day tomorrow and call back on Tuesday if they forget? Or do I keep pestering? It's a catch-22, but I guess I'm making this into something it's not. I'm sure they'll call tomorrow. I'm sure of it.
I need to do something constructive with all this free time I have. But I'm down in the dumps. I was supposed to go see my Dad tonight for dinner, that would have been nice. But my ride got sick... Oh, did I tell you I also don't have any mobility if it isn't my friends carting me around?
I look back at leaving new york city as a blessing and a curse... It was so easy to have a life without a car payment and insurance to deal with. But I was losing it, I needed fresh air and grass. I wish the spring would just get here already and if I never saw winter again I think I would be happy.
Trying to stay positive, maybe I'll post an old recipe later. Sorry for the rant. Sometimes you just have to get it out though, ya know?
Wednesday, March 23, 2011
Pasta Carbonara

This recipe is great if you want something really delicious in a short period of time, well… Shorter than most of my recipes, haha. My friends once again, say they will never let me leave because they demand I cook for them every evening.
Ingredients:
• 1 box of bowtie pasta
• 2 cups of thawed frozen peas
• .5 a package of bacon, or one of the mini packages
• .5 of a yellow onion
• 4 cups of heavy crème
• 3 boneless skinless chicken breasts, cleaned and cut into cubes
• .5 stick of butter
• a few cloves of garlic
• dash of salt
• dash of pepper
• dash of oregano
• squeeze of lemon
Start off boiling the pasta, cause that always seems to take forever. Look right at the directions on the back of the box, they’re always right. So just set a timer and there you have it. Always make sure to rinse with cold water; otherwise the pasta will continue to cook even if it’s not in the boiling water anymore! Duh, and throw a tablespoon of olive oil on them and swish them around so they don’t stick together.
Cook your bacon how you normally would, let it dry and cool on a paper towel to remove the access oil. Once it’s cool enough to touch, chop your bacon into bacon bits! NO, you may not substitute bacon with bacon bits. We do not live in a double wide… Well, you might. In which case I empathize. My mom downgraded once I left for college, not a pretty site.
Next you’re going to take your onion and garlic and caramelize them in the butter. Your chicken should already be cleaned, tenderized, and cut by now. So you’ll throw all of that into the pot with the onions and garlic and simmer, stirring occasionally. Once you see that all the juices have really left the chicken, [I always just scoop out an extra piece to be sure it’s not pink in the middle] you can add the crème , peas, and crispy bacon to your chicken.
Add the spices slowly but surely, tasting occasionally to see if it needs more of one thing over another. You shouldn’t need too much salt because the bacon is really salty already.
The thing that’s great about heavy crème is that it doesn’t curdle when it touches heat, and it’s way easier than making a béchamel sauce from scratch. I’ve made quite a few mistakes where I thought just throwing in flour and milk would make this beautiful fancy white sauce, WRONG. It curdles and ruins everything, it’s very frustrating and takes a lot more consideration. So just stick to the heavy crème okay simpletons? Hahaha ;}
I had one too many glasses of champagne last night… Ugh. How is everyone elses day going? Anyone want to ask me to make something specific? I’d love a challenge tonight!
Yours forever Food Lovers,
Justin Francis Kane
.
Wednesday, March 16, 2011
Seared Chicken with an Onion & Peach Glaze

So the other night my friend Norah and I went to visit my father and his girlfriend Kim up in Queensbury NY. I wanted to try something a little different, so I came up with this Onion and Peach Seared Chicken Glaze. I hope you guys like it, it was a huge hit!
Ingredients:
• 2 large boneless, skinless chicken breasts
• 1 stick of butter
• 4 very ripe peaches
• 1 small yellow onion
• 4 cloves of garlic
• splash of dry white wine
• dash of rosemary
• dash of salt
• dash of pepper
• dash of sugar
• jasmine Rice, 1 cup of rice to 2 cups of water.
First take half the stick of butter, dice the onion and garlic, and caramelize. Cut your peaches in half, and core out the center. We’re not trying to gnaw on those killer pits. Place the peaches cut side down, and cook on low for about 30 minutes. Remember to cover them with a lid so the moisture doesn’t escape. If it looks like they’re drying out, add a little water.
While that’s going, you’re gonna clean and tenderize your chicken, and I cut them into nice meaty chunks. Sprinkle on the rosemary, salt, and pepper and wait for the peaches to be done.
Throw the chicken in with peaches and let them cook till most of the juices run out, but not completely! Then remove the chicken onto a plate and wait.
Take 3 or 4 of the peach halves and set them aside to use as garnish later, they should be nice and mushy and the skins should be just about able to fall off. Pour the rest of the peaches and onion mixture into a pot on the back burner, add a good full cup of wine and let them simmer and bubble till it starts to thicken. Should take a good 15 minutes or so. Add a dash of sugar if it’s not sweet enough!
Use the skillet from before and use the rest of the butter, then throw the chicken back in. Leave it on high heat and let the sides of the chicken get nice and roasted toasted. Golden brown is what you want! Once they’re done, you can start plating the chicken.
You’re gonna strain the sauce from the back burner through a sifter or a colander if you have one, otherwise… Good luck, I hate chunky glaze. The sauce should be pink, and be very fragrant of onion and peach! Duh…
For the main staple I made some Jasmine rice, and also a nice bitter vegetable like asparagus with lemon pepper and white vinegar [Basically just my caramelized asparagus recipe, which as you can tell i'm very fond of!]. Brustlesprouts wouldn’t be a bad choice either! But it was nice to counterbalance the sweetness of the peaches. And for a starch filler, I pumped out some jasmine rice... Hope I don't need to explain how to cook that since you just need to follow the instructions ;P
Drip the sauce over the rice and chicken and voila! This was a great experiment, and I look forward to using other fruits like apples and pears. Have a good one guys! I've gotta run to the DMV today and see why the hell my license is suspended, oh the woes of me! Haha.
Later Food Lovers,
Justin Francis Kane
.
Subscribe to:
Comments (Atom)